 Home
Home RSS:
RSS:  Recognition
 Equipment
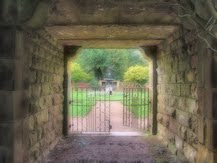

| Camera | Sony DSC-F828 |
| Exposure Mode | auto bracket (±1 EV) |
| Focal Length | 7.1mm |
| Aperture | f/3.5 |
| Exposure | 1/60 sec. |
| ISO Speed | 64 |
| Flash | off |
One of the entrances to this particular part of the gardens is through a short stone tunnel which runs under a viewing platform (probably dating to when the area of the garden was actually a bowling green). The darkness of the tunnel compared to the garden beyond was accentuated by the tall trees bordering the path up to the gate. It really did look like a hidden path into a secret garden. At the time I wasn't entirely sure what I wanted to capture and so took a range of photos at different exposure settings as well as a couple of bracketed sets for creating HDR images. When I looked through the photos on the computer the following bracketed set stood out as the most promising.

 So the first step was to use PaintShop Pro to combine the three photos using the HDR merge tool. As usual the default settings weren't really appropriate and so after some playing around I settled for using a brightness of 40 and clarity of 75. For some reason the merged photo exhibited quite a lot of noise and so I ran the One Step Noise Removal tool which cleaned it right up. I then used the Smart Photo Fix dialog (settings of 0, 0, -30, 30 and 0) to restore some colour to the photo. The photo to the left shows how it looks at this stage. Now I quite like this photo but I decided to make one more adjustment to get the final photo for the blog.
While I like the intermediate photo I wasn't convinced that it was quite right. I decided that I wanted to soften the image a little and give it a dream like quality. After playing around for a while I discovered that the Soft Focus option (with the default settings) resulted in something close to what I was looking for. I guess that given how much computer processing went into this weeks post it is probably an image rather than a photo but I'm reasonably happy with the result and if you all enjoy it then it doesn't really matter what we call it.
1 comments:
To my mind that is the perfect use of HDR and the result enabled the viewer to see the best of everything in that the way that an eye would automatically adjust as you look at each component in real life.
Post a Comment